Tuesday November 22, 2016 at 4:57pm
One of the many new features within the new release of SOLIDWORKS 2017 is the enhancements made to the wrap feature. Find out More about this enhancement in this blog post.
One of the many new features within the new release of SOLIDWORKS 2017 is the enhancements made to the wrap feature. The updates now
allows users to apply sketch geometry to all face types and multiple faces
simultaneously.
In this blog we will explore the options available to us in
the property manager of the wrap feature and how the different options will
create distinguishably different appearances to the final design. To express
this feature, we will look at the recently designed Solid Solutions Hover
Mower.

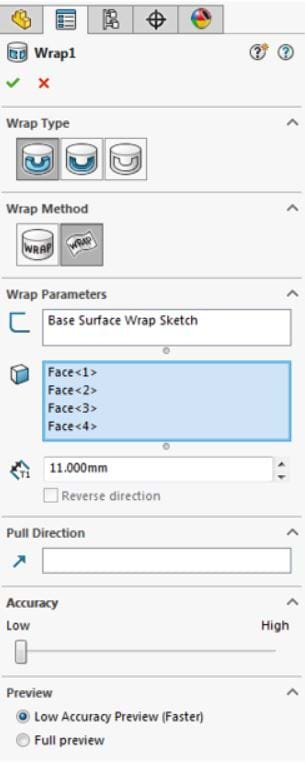
When in the property
manager of the wrap feature there are a number of options to choose from as
seen in the accompanying image:
Wrap type: the wrap type dictates the protrusion applied to the
sketch be it raised (emboss), indented (deboss) or simply imprinted on the
surface (Scribe)
Wrap Method: the two wrap methods include the traditional
analytical method whereby the sketch can be applied to cylindrical and conical
faces and the new Spline surface method, used when applying a sketch to any
face type.
Wrap Parameters: the selection made here define the sketch used
and the faces to which the sketch needs to be applied to. Finally, the
thickness value dictates the depth of the protrusion.
Pull Direction: this parameter determines the direction of the
protrusion. Should a plane be selected, then the direction of pull will always
be normal to the plane.
Accuracy: Controlled by a slider, this allows the user to
determine how accurately the sketch is mapped to the surface, with a greater
accuracy reducing the tolerance at which the defining geometry deviates from
the sketch.
Preview: as with other features this indicates how the
feature will look when applied to the model.
Within this case study of the Lawnmower, we can see how the various
options alter the design of the model. Below we can see an example of how the
wrap type varies from emboss, deboss and scribe when applied to the cutting
blade of the lawnmower.
The feature is used here to add detail and inform the
operator of the lawnmower the mounting orientation of the blade, should it be
removed from the device and replaced.

Deboss

Emboss

Scribe

Further to this the spline surface method was used to apply
the perforations to the surfaces of the grassbox. These perforations are
essential to the air flow through the system to drive the impeller which help
provide the lift for the lawnmower to hover. The design of the grassbox can be
seen below:

This conclude our summary of What’s New with the wrap tool in
SOLIDWORKS 2017. Go ahead and try it out for yourself!
By Jassim Alali
Applications Engineer