Wednesday March 29, 2017 at 3:26pm
Applications Engineer, Rory Niles takes us through his latest blog 'Confusing Configurations' in an effort to help save you time whilst configuring your parts.
Confusing
Configurations?
If you do a
range of similar products, you will know that configurations of your parts will
save you a whole lot of work on a daily basis, but once you have started
putting these parts into assemblies it can get confusing.
Basically, the possibilities all multiply, as does the potential for selecting
and changing the wrong thing…
Here we have
a “Bracket” part with some configurations in it: -

This has
been used in an assembly (that may be vaguely familiar to many of you), and as
you can see from the picture, I have created some configurations in that top
level assembly called “Basic,” “Bench Mount” and “Back Plate Mount,” and I have
just selected the Bracket on screen and used the drop down list to swap the
configuration of the part that is used in each configuration of the assembly: -

That to me
is the simplest way of doing it – and that’s what I’m after here.
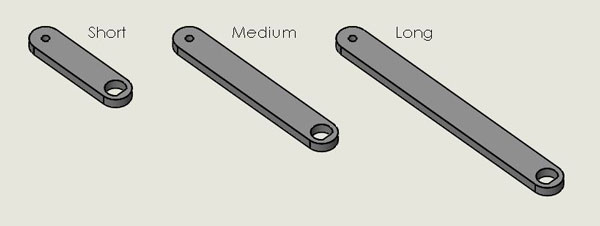
I also have
some other parts with configurations, the “Crank arm”: -
And the
“Knob”: -

I have
fitted these together in another assembly, called “crank sub”,
I then created configurations of this assembly, and I just used the drop down
selection list to swap the configurations of the parts that the assembly configurations
use: -

So now my “crank sub” assembly has these
combinations: -

Great, so far so good.
It is when the “crank sub” is put in
the top level assembly “Universal Joint”
that there is the potential for confusion!
I want a
range of Universal Joints with different cranks, the important thing to note is
that it makes a big difference where you
select things!
You really
don’t want to select parts that are inside the sub assembly from the graphics
area of the screen when looking at the main assembly, and switch their
configurations from the drop-down list – like this: -

By selecting
that part on screen I would be
changing the configuration of the part that is being used by the currently selected configuration of the sub assembly!
In other
words I would be in effect editing the
sub assembly, and I could get something like this if I was to go ahead:
-

Which is not
what I want at all!
What I
should do from the main assembly (once I have corrected the configurations in
the sub assembly!) is select the name of the sub assembly from the
design tree: -

Then I am
selecting the existing configurations of the sub assembly that the main
assembly will use – then I can get my full range of different machines: -

So this is
how it breaks down: -

If in any
doubt open up each level (part/sub assembly/top level assembly) and follow it
through…
And if you
want to change what configuration of your sub assembly is being used by your
main assembly select its name from the tree!
I hope that
helps!
Rory Niles.